
This guide covers the practical sizing and placement rules that schools, uniform shops, and families commonly follow for school badges for blazers.
What size should school badges be for blazers?
Most Australian schools use a badge that looks proportionate to the blazer chest, usually in the 70–90 mm tall range for a standard shield shape. The right size is the one that stays readable from a few metres away without dominating the blazer front.
As a rule, smaller primary blazers often suit the lower end of the range, while senior blazers can carry a slightly larger badge.
How do they choose a badge size for different blazer sizes?
They should scale badge size to the wearer, not just the garment label size. A badge that looks perfect on a size 16 blazer can look oversized on a size 8 and cramped on a size 24.
Uniform suppliers in Australia often keep one standard size for simplicity, then adjust blazer badge design and placement carefully to maintain balance. If a school allows multiple sizes, they typically offer a junior and senior option.
Where should school badges be placed on a blazer?
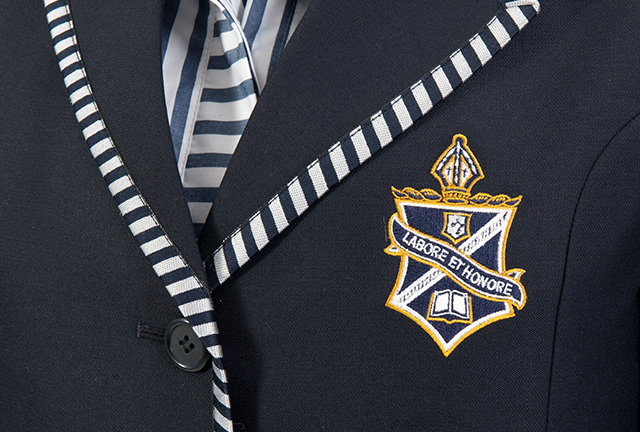
Most schools place the badge on the left chest (the wearer’s left), positioned so it sits over the breast pocket area or in the equivalent location if there is no pocket. The goal is a centred, symmetrical look when the blazer is worn and buttoned.
For school badges for blazers, the most common visual target is “left chest, aligned to the blazer’s front edge and lapel line.”
How far down from the shoulder seam should the badge sit?
They usually start by measuring down from the shoulder seam at the armhole and placing the top of the badge around 70–110 mm below that point, depending on blazer cut and badge height. This keeps the badge away from the shoulder line and prevents it from riding too high.
If the badge is taller, they should keep the top consistent and let the bottom fall naturally, rather than pushing the whole badge down.
How close should the badge be to the lapel and blazer edge?
They should leave enough clearance so the badge does not tuck under the lapel when the blazer moves. In practice, many schools aim for about 25–40 mm between the badge edge and the blazer front edge, but the blazer’s lapel width matters more than a fixed number.
For school badges for blazers, a clean margin around the badge helps it look intentional, not squeezed in.
Should the badge be centred on the pocket or above it?
If the blazer has a left chest pocket, they typically centre the badge over the pocket area so it looks aligned with the pocket opening and piping. If the blazer has a pocket with a crest-shaped “badge patch” position, they use that as the anchor point.
If there is no pocket, they should visually centre the badge in the same zone where a pocket would sit to keep the uniform standard across students.
What are the rules for embroidered badges versus woven badges?
Embroidered badges are generally thicker and can sit slightly above the fabric, meaning they require careful stitching to minimise puckering. Woven badges offer a flatter finish with sharper fine detail, allowing some smaller designs to remain clear and readable without adding as much bulk.
Schools using school badges for blazers should choose the construction that suits their design, then confirm that small text and borders remain legible at the chosen size.
How do they prevent puckering on blazer fabric?
They should stabilise the area behind the badge, especially on lighter-weight blazer cloth or where the weave is loose. A small backing layer can help the blazer front sit flat after stitching.
They also need to avoid pulling the thread too tight and should stitch evenly around curves. Puckering is usually a tension and support problem, not a badge problem.
Should school badges be sewn on or ironed on?
Most Australian schools prefer sewn-on badges for durability and a cleaner finish over time. Iron-on options can work for temporary placement, but school blazers need badges that can withstand regular movement and dry cleaning, which may eventually weaken adhesive edges.
For school badges for blazers, sewing is usually the long-term option that survives assemblies, sport travel, and formal events.
What stitch type and thread colour should they use?
They generally use a neat edge stitch, such as a tight whip stitch or small straight stitch close to the badge border. Thread is usually matched to the outer border colour of the badge, not the blazer colour, so the stitch disappears into the badge edge.
If the badge has a dark border, a matching dark thread often looks the most professional on navy blazers used across many Australian schools.
How do they place badges on single-breasted versus double-breasted blazers?
Single-breasted blazers usually give a straightforward left chest position with minimal overlap. Double-breasted blazers can shift how the front sits when buttoned, so placement should be checked while the blazer is done up.
For school badges for blazers, they should pin the badge in place, button the blazer, and confirm the badge stays square and visible, not angled into the fold.
Do girls’ and boys’ blazers need different placement?
They sometimes do, because blazer shaping can change where the chest line sits. Some girls’ cuts taper differently at the waist and may have a different pocket height.
They should base placement on visible balance: level, centred on the left chest zone, and consistent when viewed from the front in the standard worn position.
What happens if the badge is placed too high or too low?
Too high can make the badge fight with the lapel and look cramped near the shoulder. Too low can drag the look downward and can sit awkwardly when they move or sit, especially if it crosses a pocket opening.
With school badges for blazers, small placement changes of even 10–15 mm can noticeably improve the overall look.
How do they align the badge so it sits straight?
They should align it to the blazer’s vertical line, not to the pocket edge alone, because pockets can be slightly angled. A simple method is to use tailor’s chalk to mark a vertical reference line parallel to the blazer front edge, then level the badge using the top border.
They should also check alignment in a mirror or by photographing the blazer worn, because flat-lay alignment can look different on the body.
Are there different rules for crest shapes, shield shapes, and circular badges?
Yes, because the eye reads each shape differently. Shields typically look best when their top line is level and their point sits centred on the pocket zone. Circular badges need extra attention so they do not appear too close to the lapel, as circles emphasise surrounding gaps.
For school badges for blazers, they should prioritise a consistent “visual centre,” not just a measurement.
How should they handle multiple badges, pins, or awards on a blazer?
Most schools keep the main crest as the primary item on the blazer front. If awards are allowed, they are often placed on the opposite side, above pockets, or on lapels, depending on the school’s policy.
They should avoid crowding near the crest, because school badges for blazers are meant to be the focal point for identification.
What about placement rules for primary schools versus high schools?
Primary schools often prioritise simplicity and may use slightly smaller crests, especially on lighter blazers. High schools may require more formal consistency, particularly for senior uniforms and leadership roles. Understanding what makes woven badges different from embroidered designs can help schools choose a finish that suits their uniform style, level of detail, and durability requirements.
In Australia, schools with multiple campuses or houses often standardise the crest size, then use colour ties, piping, or lapel pins to show house or role rather than altering the main badge.
How do they confirm the school’s official requirements?
They should check the school uniform policy, the enrolment pack, or the nominated uniform shop guidance. Many Australian schools provide a diagram or specify “left chest” plus a distance from the shoulder seam or pocket.
If there is uncertainty, they should confirm before sewing, because correcting school badges for blazers after stitching can leave needle marks.
What is the easiest step-by-step method to place the badge correctly?
They can get it right quickly by following a repeatable process. This method suits most Australian school blazers and reduces “guesswork placement.”
- Put the blazer on a flat surface and smooth the front panel.
- Identify the left chest zone, using the pocket as the anchor if present.
- Pin the badge lightly, keeping clear of the lapel fold.
- Button the blazer and check in a mirror or photo for level and balance.
- Adjust by small amounts, then re-check.
- Sew around the edge with matching thread and even tension.
Done carefully, school badges for blazers sit straighter, last longer, and look consistent across the cohort.
How do they care for blazers once the badge is attached?
They should follow the blazer care label first, especially for wool blends common in Australian uniforms. If dry-cleaning is used, sewn edges usually hold better than adhesive.
They should also avoid storing the blazer crushed, because creasing around the chest can distort the badge area over time. For school badges for blazers, good care is what keeps the badge looking flat and sharp across the school year.
What are the most common mistakes they should avoid?
The most common issues are avoidable with one careful fitting check. Most mistakes come from rushing the placement and relying on a single measurement.
They should avoid: placing too close to the lapel, sewing with tight tension that puckers the fabric, using contrasting thread that shows, and positioning based on a pocket that is slightly off-level. With school badges for blazers, neatness is usually the difference between “fine” and “formal-ready.”
FAQs (Frequently Asked Questions)
What is the ideal size range for school badges on blazers in Australian schools?
Most Australian schools use a badge size that ranges from 70 to 90 mm tall for a standard shield shape. The badge should be proportionate to the blazer chest, readable from a few metres away, and not dominate the blazer front. Smaller primary blazers suit the lower end of this range, while senior blazers can carry slightly larger badges.
How should badge size be chosen relative to different blazer sizes?
Badge size should scale to the wearer rather than just the garment label size. For example, a badge that fits well on a size 16 blazer may look oversized on a size 8 and cramped on a size 24. Many uniform suppliers keep one standard badge size for simplicity but adjust placement carefully. Some schools offer junior and senior badge sizes to accommodate different blazer sizes.
Where is the correct placement for school badges on blazers?
School badges are typically placed on the left chest (wearer’s left), aligned over the breast pocket area or in an equivalent location if there is no pocket. The placement aims for a centred, symmetrical look when the blazer is worn and buttoned, usually aligned with the blazer’s front edge and lapel line.
How far down from the shoulder seam should a school badge be positioned on a blazer?
The top of the badge is generally placed about 70 to 110 mm below the shoulder seam at the armhole, depending on blazer cut and badge height. This positioning keeps the badge away from the shoulder line and prevents it from riding too high. If using a taller badge, it’s best to keep the top consistent and allow the bottom to fall naturally.
What are best practices for sewing school badges onto blazers?
Most Australian schools prefer sewn-on badges for durability and a cleaner finish over time. A neat edge stitch such as a tight whip stitch or small straight stitch close to the badge border is recommended. Thread color usually matches the outer border of the badge rather than the blazer color to make stitches less visible. Stabilizing fabric behind the badge helps prevent puckering.
How do placement rules differ between single-breasted and double-breasted blazers for school badges?
Single-breasted blazers typically have straightforward left chest placement with minimal overlap. Double-breasted blazers require checking placement while buttoned because their front folds can shift. Badges should be pinned in place, buttons fastened, and confirmed that they remain square, visible, and not angled into folds when worn.